


Earning every trophy requires keen exploration alongside sharp combat fundamentals. Following a thorough rubinite achievements guide helps you navigate both natural story progression and the hidden challenges tucked behind specific encounter mechanics.
- Rubinite Story Achievements
- Wake Up From a Nightmare
- Defeated the Beast
- Repelled the Guardian
- Defeated the Dual Cultists
- Defeated the Martyred Angel
- Defeated the Grave Keeper
- Defeated the Plague Bearer
- Defeated Faye
- Defeat the Ghost
- Defeated Roy
- Defeated the Witch
- Maybe the End
- Escape the Illusion
- True Difficulty
- First Encounter?
- Someone Else’s Past
- Defeated the Red-Eyed Tree
- Defeated… Myself?
- Remove the Curse
- Defeated the Puppeteer
- Obtain the Legendary Rubinite
- Leave the Rest to Me!
- Save the Kingdom
- RUBINITE
- Rubinite Missable Achievements
- Amulets? Pffft. Forget Them
- True Hunter
- I’m Not Tasty at All!
- Bomb Disposal Expert
- Plague It Cool
- Out of Body
- Don’t Even Think About It
- You Dare Use My Own Weapons Against Me, Ruby?
- Illuminate the Night
- Fulfilling a Wish
- There You Are
- Collection Achievements
- Finder’s Keepers
- Talismans Connoisseur
- Fully Fledged
- Can You Miss 100% Completion?
While the game provides opportunities to revisit areas and face previous bosses, tackling these tasks during your initial run prevents substantial backtracking later. Knowing what each encounter demands before stepping into the arena makes 100% completion much smoother.
The list below presents every unlock condition in chronological order. We begin with the mandatory campaign milestones before breaking down optional combat criteria and regional collectibles.
Rubinite Achievements Overview
| Type | Total |
|---|---|
| Total Achievements | 38 |
| Story Achievements | 24 |
| Missable Achievements | 14 |
Standard progression accounts for 24 achievements across the primary storyline. The remaining 14 require executing precise combat maneuvers, discovering tucked-away secrets, or collecting regional upgrades throughout the monastery.
Rubinite Story Achievements
These milestones unlock automatically as you clear chapters on Normal difficulty. Maintaining forward momentum guarantees almost all of them without special preparation.
Wake Up From a Nightmare
This unlocks during the prologue immediately upon starting a new game. Simply complete the brief opening tutorial sequence and awaken from the dream.
No special actions or extra steps are required for this trigger.
Defeated the Beast
The Beast serves as the first mandatory boss encounter in the campaign.
Deplete its health bar to advance the narrative. The achievement pops immediately during the post-battle scene.
Repelled the Guardian
The Guardian blocks your deeper progress through the early monastery grounds.
Bring down this mechanical sentry and continue walking into the central halls to register the unlock.
Choose Your Path:
Defeating the Guardian opens a split path leading across two wings of the monastery.
You can pursue either destination first:
- North toward the Priest route
- South toward the Grave Keeper route
Your chosen order does not lock you out of content, as both branches must be cleared to proceed.
The northern wing generally features more forgiving attack windows, which makes it the recommended starting point.
Defeated the Dual Cultists
Take the northern passage until you enter the chamber containing the Dual Cultists.
Eliminate both targets to claim the achievement and open the connecting doorway.
Defeated the Martyred Angel
Proceed deeper into the northern quarter after felling the cultists.
Confront and defeat the Martyred Angel at the end of the corridor to secure this unlock.
Defeated the Grave Keeper
Return to the main crossroads and travel south into the catacombs.
The Grave Keeper relies on broad swings whose hitboxes extend further than their weapon models suggest. Stay patient and punish only during clear recovery animations rather than trading blows recklessly.
The notification triggers the moment the final strike lands.
Defeated the Plague Bearer
Continue moving downward into the damp lower levels to challenge the Plague Bearer.
Because this creature divides itself across the floor, basic blade combinations are far safer and more consistent than committing to slow Focus Strikes.
Empty its final form to secure the victory.
Defeated Faye
Both wings converge on your second duel against Faye.
Overcoming her aggressive blade patterns unseals the grand portal leading directly into the midgame.
Defeat the Ghost
Your subsequent mandatory duel pits you against Grant.
His stealth mechanic can disorient you early on, but applying a Focus Mark reveals his silhouette even while cloaked.
Equipping the Thorns Charm also chips away at his defensive plating whenever he attempts close-quarters collisions.
Best Grant in combat to claim the reward.
Defeated Roy
The encounter with Roy stands out as one of the fairest and most deliberate duels in the adventure.
Every strike in his arsenal comes with generous startup cues. Focus on studying his telegraphs rather than attacking relentlessly.
Defeated the Witch
The next obstacle in your path is the spellcaster Alcina.
Her projectile spreads are punishing, but her recovery phases leave large openings once you memorize her casting rhythms.
Bring her health down to earn the achievement.
Maybe the End
After finishing off Alcina, watch the subsequent narrative sequences and let the credit crawl play out entirely.
The achievement pops when the final credit text fades.
Escape the Illusion
From the main menu, load your cleared campaign file.
You will reappear prior to the finale and unlock access to the waking world, immediately granting this achievement.
True Difficulty
Entering the true reality forces another showdown with the Beast.
Defeat this upgraded variant to register the reward.
First Encounter?
Advance through the real-world campaign until encountering Mira following the initial clash with Faye.
Exhaust her dialogue sequence to trigger the unlock automatically.
Someone Else’s Past
The late game requires a mandatory rematch against Grant.
Following his defeat, Mira unseals an adjacent private chamber.
Head inside and interact with the Swan relic to register the milestone.
Defeated the Red-Eyed Tree
Upon inspecting the Swan, Mira unlocks the gateway directly forward.
Step into the newly revealed clearing and conquer the Red-Eyed Tree to claim this trophy.
Defeated… Myself?
Confront Roy once more within the real-world storyline.
After subduing him, dive inside his mental realm to face your own mirrored shadow.
Win this psychological battle to unlock the achievement.
Remove the Curse
This unlocks in tandem with felling your shadow inside Roy’s consciousness.
No extra interactions or choices are necessary.
Defeated the Puppeteer
You will cross paths with the Puppeteer right before the decisive conflict against Alcina.
Break through its defenses to pop the achievement.
Obtain the Legendary Rubinite
Walk forward along the narrative path after slaying the Puppeteer.
You acquire the Legendary Rubinite during the subsequent cutscene, granting the reward immediately.
Leave the Rest to Me!
Speak with Mira directly prior to starting the final showdown.
Pick the supportive dialogue choice assuring her that everything will be resolved, then step forward to face Alcina.
The achievement unlocks as soon as you confirm that promise.
Save the Kingdom
Conclude the campaign on any available difficulty setting to secure this clear bonus.
RUBINITE
Complete the story specifically on Normal difficulty.
This marks the final narrative milestone and signals the completion of your initial run.
Rubinite Missable Achievements
The missable list focuses heavily on specific boss constraints and secluded interactions. You can retry most boss requirements through the monastery shrine or end-game saves, but finishing them on your first attempt saves valuable playtime.
Amulets? Pffft. Forget Them
You must fell any major boss without equipping a single talisman.
The earliest encounters provide the lowest barrier to entry:
- The initial Beast fight
- The prologue duel against Faye
These early opponents have small health pools and predictable swings, meaning empty accessory slots will barely affect your combat performance.
True Hunter
Complete an entire boss encounter without taking a single hit of damage.
The first duel against Faye is the ideal playground for a hitless attempt. Her telegraphs are broad and readable, allowing you to react comfortably after just a couple of practice rounds.
Sustaining even a glancing blow invalidates the attempt, requiring you to pause and restart the fight immediately.
I’m Not Tasty at All!
This condition must be fulfilled during the battle with the Dual Cultists.
One cultist occasionally winds up an unblockable maw attack meant to engulf you. Stand your ground and intentionally let the grab connect.
Break free from the bite animation, and the achievement will register immediately.
Bomb Disposal Expert
Achieved during the catacomb encounter with the Grave Keeper.
Following his whirling assault, he scatters small organic sacs across the floor that rapidly swell and detonate.
Dash around the arena and slash every single blob while they are still in their dormant, miniature state.
Allowing even one bomb to expand and burst will fail the objective, forcing a retry.
Alternate Method:
The Grave Keeper is not guaranteed to trigger this attack if pushed hard enough.
Bursting his health down before he casts the summon skips the hazard entirely, unlocking the trophy automatically at the conclusion of the match.
Plague It Cool
This ranks among the most delicate combat achievements in the campaign.
During the duel against the Plague Bearer, the creature cleaves into separate entities as it takes damage.
Follow these exact combat priorities:
- Damage the primary target until the initial split occurs.
- Completely ignore the newly created smaller form.
- Focus all incoming strikes exclusively on the large body.
- Force the primary mass to divide a second time.
- Resume normal combat only after three separate forms inhabit the floor together.
Accidentally slaying the smaller offshoot before the second division cancels the achievement condition, requiring a match reset.
Out of Body
Tied to your first full combat encounter against Grant.
Grant periodically sacrifices a portion of his own health pool to shed his armor plating.
You must defeat him completely before he executes this self-damaging ritual.
Maintain relentless offensive pressure and break his protective shell manually so he never initiates the animation.
Don’t Even Think About It
Perform this challenge during your second encounter with Faye.
She frequently winds up close-range command grabs throughout the duel.
You must successfully parry every single grab attempt she unleashes.
Rolling away or dodging does not satisfy the condition; each grab must meet your blade parry directly.
Whiffing the timing or getting grabbed once immediately nullifies the achievement.
Restart the match as soon as you miss a parry window to save time.
Her second combat phase is actually more manageable for this feat, as she favors blade flurries over grab attempts.
You Dare Use My Own Weapons Against Me, Ruby?
This cannot be completed during your initial story match with Roy.
Pick up Roy’s Daggers following the fight and equip them within your Charms loadout.
From there, complete the following steps:
- Travel back to the Monastery.
- Interact with the shrine to initiate a boss rematch.
- Select the battle against Roy.
- Hurl his own daggers into him during the fight.
Winning the rematch is unnecessary.
Connecting a handful of projectile hits using his personal daggers unlocks the trophy immediately.
Illuminate the Night
This is easily overlooked because the game never directs you to revisit the grounds after clearing the area.
Once Roy is defeated, tour the monastery halls and light every unlit candle mounted on the walls.
Igniting the final candle immediately awards the achievement.
Missed It Already?
If you progressed past the point of no return, simply reload your cleared save file after the credits.
You will respawn in the monastery before the final sequence, leaving all candles accessible for lighting.
Fulfilling a Wish
This achievement unlocks once you fully max out every node on your offensive skill tree.
With all attack upgrades purchased, venture into the basement chambers and slay the Penitent.
The unlock registers as soon as the Penitent falls.
There You Are
A secret corridor lies tucked just before the chamber of the Red-Eyed Tree.
Instead of crossing the threshold into the arena, push left against what appears to be solid stone masonry.
You will slip directly into an invisible winding labyrinth.
Navigate through the concealed path using this sequence:
- Down
- Left
- Up
- Left
- Down
- Left
You will reach a hidden chamber housing an NPC, triggering the achievement.
You can also fight and defeat this hidden character if you want extra combat practice.
Is It Really Missable?
It is not permanently lost if you enter the boss room.
You can backtrack out of the arena after felling the Red-Eyed Tree, provided you do not exit the overarching zone entirely.
Collection Achievements
The remaining achievements revolve around exploration, currency gathering, and full loadout completion rather than individual duel mechanics.
They require scouring the monastery rooms, amassing plenty of Blood Dust, and wrapping up loose ends before heading into the final chapters.
Finder’s Keepers
To earn Finder’s Keepers, you must discover and loot all eight treasure chests concealed across the Monastery.
While some sit in plain view, others hide behind structural pillars or clever visual tricks. Listen for subtle audio cues when moving through rooms to pinpoint nearby containers before departing.
Here is where to find all eight chests across the complex.
Main Room Chest

The opening container rests inside the central Main Room.
Walk around the massive central effigy until you are standing directly behind it. The statue completely obscures the chest model, making it easy to bypass during routine transit.
Once you check behind the stone plinth, you can grab the contents without hassle.
Side Hall Chest
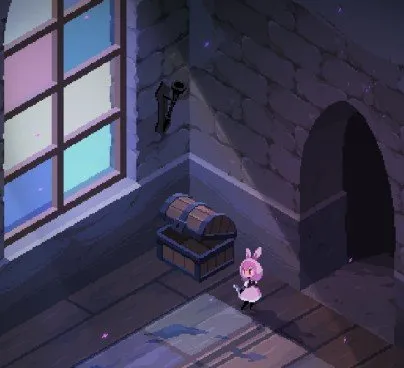
Another container waits within the connecting Side Hall.
This box is placed directly against the hallway perimeter and can be scooped up as you walk past.
Dining Hall Chest
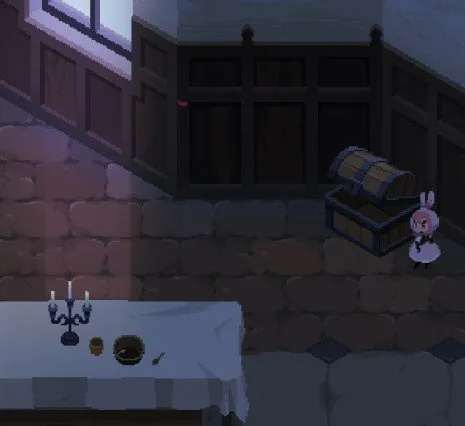
Enter the monastery Dining Hall to find the third chest.
Approach the long banquet table and move slightly north along its right boundary.
It sits unblocked on the floorboards, though many runners miss it by rushing straight through the center aisle.
Library Chest
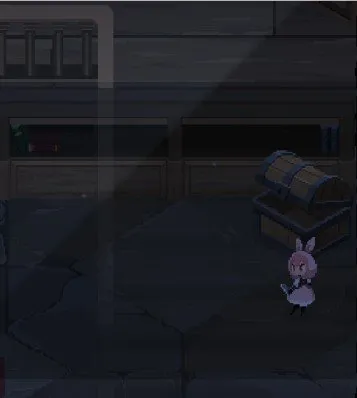
Proceed into the multi-level Library.
Bypass the surrounding bookshelves and inspect the empty cavity beneath the main wooden staircase.
The chest rests deep under the steps where shadow blends it into the woodwork.
Courtyard Chest

Step out into the open-air Courtyard for the next collectible.
Locate the second stone column on the left side and inspect its base from behind.
The pillar’s perspective completely blocks the box from the main path, requiring you to physically round the column to spot it.
Mirror Room Chest
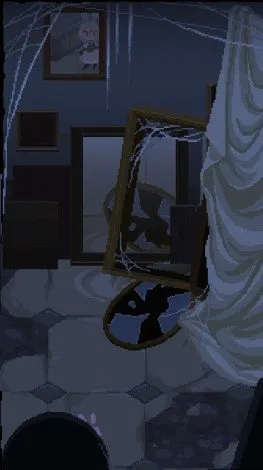
This is arguably the most inventive visual puzzle in the entire monastery.
Inside the Mirror Room, examine the large glass surface mounted on the wall.
The glass reflection displays an object that seems absent in the physical room around you.
Trust the mirror’s perspective and navigate down to the bottom-left corner of the chamber.
Interact with the empty space to loot the hidden container.
Abbot’s Office Chest

Head into the private quarters of the Abbot’s Office.
This chest does not use optical tricks or obscuring geometry.
Walk along the floorboards and open it before exiting the study.
Sick Ward Chest

The eighth and final container rests within the Sick Ward.
Check between the rows of patient cots to locate the box resting against the wall.
Loot it to finalize the regional chest checklist.
With all eight monastery chests cleared, Finder’s Keepers triggers immediately on screen.
Talismans Connoisseur
This task requires collecting every talisman available across the campaign.
While crafting accounts for most of your inventory, a handful of essential charms are awarded exclusively through late-game plot milestones.
Ensure you satisfy all collection prerequisites:
- Restore every Broken Talisman by visiting Wichiwi.
- Invest enough Blood Dust to forge every cataloged talisman.
- Follow the true ending pathway to collect all narrative charms.
- Keep Roy’s Daggers in your inventory, as they count toward the complete total.
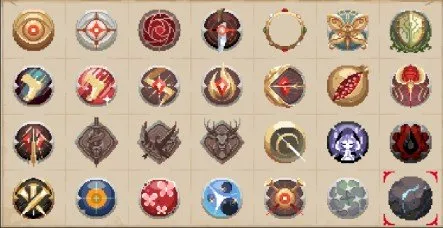
The achievement pops when collecting the Pure Rubinite, provided all prior accessories have already been obtained. Missing a single crafted charm beforehand may force you to repeat the crafting cycle on a fresh save file.
Fully Fledged
This serves as the primary character development achievement in the game.
Breaking free from the illusion fundamentally rewrites Ruby’s talent tree. Previous vitality and flask enhancements vanish, making way for specialized high-impact combat perks.
Farm sufficient Blood Dust to purchase every talent across this secondary layout.

The unlock occurs the instant you confirm the final skill point. Blood Dust farming accounts for the bulk of this time, so treat it as an end-game cleanup task.
Can You Miss 100% Completion?
No achievement is permanently locked out on a single save.
You can fulfill missed boss criteria through monastery rematches or by reloading your cleared save after the credits. The post-game file places Ruby right before the point of no return with all regional paths open.
Keep in mind that collection tracking can occasionally glitch when carried into New Game Plus. Finishing Talismans Connoisseur cleanly in your initial cycle prior to picking up Pure Rubinite remains the safest route to 100% completion.