



In The Mermaid Mask, puzzles can range from straightforward to maddeningly intricate, with key clues often tucked away in notes, paintings, or dialogues that players might easily overlook. This challenge is part of what makes the game’s exploration so immersive and rewarding.
Successfully solving these puzzles is essential not only for rewards but also to unravel the layered narrative. Many puzzles unlock only after progressing certain story beats, so timing your investigation and absorbing all available hints pays off significantly.
Warning: This article contains major spoilers for The Mermaid Mask.
The Mermaid Mask All Puzzle Rewards
Each puzzle in The Mermaid Mask offers unique rewards that aid your journey. Here’s a detailed table of where to find these challenges and what each yields upon completion:
| Puzzle | Location | Reward |
|---|---|---|
| Serpent Statue Cabinet | Mess Hall | Sun Tablets |
| Perfume Shelf | Dream Chamber | Bookshelf Unlock |
| Wooden Chest | Child’s Room | Glass Eyeball |
| Electrical Switchboard | Control Room | Captain’s Log |
| Model Town | Captain’s Quarters | Film Reel |
| Pig Safe | Symmetry & Sinthia’s Bunk | Underwater Photo |
| Phone | Dirk & Wirman’s Bunk | Phone Access |
| Typewriter | Dirk & Wirman’s Bunk | Handwritten Letter |
| Compasses | Engine Room | Ocean Map |
| Pin Board | Cargo Hold | Moon Photo |
| Diving Helmet | Airlock Grotto | Pocketbook |
| Switch | Bilge | Bilge Access |
| Wooden Panel | Illusion Theater | Lifesize Doll & Film Projector |
| Mushroom Puzzle Box | Cargo Hold | Dictaphone Tape |
| Electronic Panel | Control Room | Handheld Radio |
| Treasure Chest | Dome Tank | Ocean Treasure |
| Skull Shelf | Cabinet of Curiosities | Mermaid’s Tongue |
The Mermaid Mask All Puzzle Solutions
Before diving into each puzzle, remember some vital tips to keep your progress smooth and avoid confusion.
- Engage every character dialogue fully, as some puzzles remain inaccessible until conversations are completed.
- Thoroughly examine all notes, letters, paintings, and item descriptions because puzzle clues often reside within.
- Explore each room meticulously, ensuring that no essential item or clue goes unnoticed.
- Retain crucial story items such as the Glass Eyeball, Captain’s Log, and Film Reel, as they not only unlock later puzzles but also advance the narrative.
- Don’t be discouraged by close answers; experiment with small variations in puzzle solutions when things almost work.
Here are detailed explanations and step-by-step solutions for every puzzle you will encounter in The Mermaid Mask.
Serpent Statue Cabinet (Mess Hall)
Location: This puzzle is found on the wall-mounted serpent statue inside the Mess Hall.
One of your earliest challenges, this logical puzzle features four rotating dials controlling sets of numbered windows. Each window must show a polygon with sides equal to its displayed number, creating a pattern that unlocks the cabinet.
Shapes correspond to numbers as follows:
- 5 = Pentagon
- 3 = Triangle
- 4 = Square
How to Solve:
Adjust the dials in this order:
- Rotate the first dial until the second window displays a Square.
- Turn the second dial so the first window shows a Triangle and the third window shows a Square.
- Adjust the third dial until the second window has a Pentagon and the fourth window a Square.
- Finally, turn the fourth dial until the third window reveals a Triangle.
Once all numbered windows correlate correctly to the polygons, the cabinet will spring open automatically.
Reward: Sun Tablets

Perfume Shelf (Dream Chamber)
Location: Find the perfume shelf against the back wall in the Dream Chamber.
This puzzle requires matching droppers to their correct perfume bottles. Labels offer some hints, but the nature of the liquids also provides critical clues to pairing each one correctly.
Solution:
Match the droppers to bottles according to these distinguishing features:
- Bottle 1: Contains an aerated liquid with bubbles.
- Bottle 2: Label marked with a large X.
- Bottle 3: Equipped with a crimson-colored label.
- Bottle 4: Holds a thick, sticky liquid.
- Bottle 5: Emits a strange vapor.
- Bottle 6: The liquid drips very quickly.
Assign each dropper to the bottle that matches its characteristics precisely to complete the puzzle.
Reward: Bookshelf Unlock

Wooden Chest (Child’s Room)
Location: Interact with the wooden chest located in the lower-left corner of the Child’s Room.
The carved clue on the chest reads:
“Jennifer and Margaret gaze jealously at Patricia, whose doll is neither too large nor too small.”
This puzzle involves arranging cards depicting three girls and correctly using special lenses to match the clue.
Solution:
- Arrange the three cards to represent three girls distinctively.
- Apply both warping lenses so the girls on the left and right look toward the girl in the center.
- Place the shrinking lens on one of the outside girls’ dolls.
- Apply the enlarging lens on the other outside girl’s doll.
The crucial part is keeping Patricia’s doll at its normal size—shrunk or enlarged dolls should only be the outer ones.
With everything correctly positioned, the chest will unlock.
Reward: Glass Eyeball

Electrical Switchboard (Control Room)
Location: In the Control Room, inspect the electronic equipment and then open the switchboard in the lower-right corner.
This puzzle only becomes available after progressing through key story conversations:
- Talk to Captain Sinthia Seafoam through the Parlor door.
- Speak with Symmetry in the Child’s Room.
- Return to Sinthia to confirm you’ve spoken with Symmetry.
The objective is to connect colored plugs to the correct socket pairs, establishing a proper circuit.
Solution:
Attach each plug to these socket pairs:
| Plug | Sockets |
|---|---|
| 🔺 Red | 1 and 9 |
| 🟡 Yellow | 4 and 6 |
| 🟦 Blue | 3 and 11 |
Once all are correctly connected, the pattern will illuminate, signaling puzzle completion.
Reward: Captain’s Log

Model Town (Captain’s Quarters)
Location: This puzzle is inside the chest on the right side of the Captain’s Quarters.
Before accessing this puzzle, you must undertake the following story actions:
- Solve the Wooden Chest puzzle to obtain the Glass Eyeball.
- Show the Glass Eyeball to Zephyr.
- Enter the Captain’s Cabin.
- Locate the HER Painting clue.
- Ask Sinthia about the painting.
- Return to the painting and rotate the top circle to unlock the Captain’s Quarters.
The puzzle within the chest simulates navigating a town by connecting a route to a red X marker.
How It Works:
Your task is to configure a continuous path through the town that reaches the red X. Each boat features a sail with a Roman numeral indicating how many spaces the path should travel before linking to the next boat.
Focus on the direction of every route tile and the number on its sail to ensure they connect properly.
Solution:
- Rotate each boat until it aligns with the neighboring routes.
- Adjust the sails as needed to match their Roman numeral distances.
- Continue systematically until the route leads seamlessly to the red X.
If the route stalls before the red X, revisit and fine-tune the nearby boats until the path is whole.
Reward: Film Reel

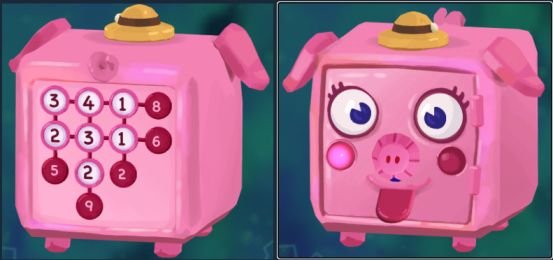
Pig Safe (Symmetry & Sinthia’s Bunk)
Location: Interact with the pig-shaped safe located inside Symmetry & Sinthia’s Bunk Room.
This safe is accessible only after you’ve talked to both Symmetry and Captain Sinthia at least once.
The safe features clickable components including the hat, eyes, cheeks, nose, and tongue. Each click alters the number grid on its back. The goal is to adjust clicks until all row and column sums match the target numbers displayed around the grid.
Solution:
From the starting position, perform the following clicks:
- Click the hat three times.
- Click the left eye twice.
- Leave the right eye untouched.
- Click the left cheek once.
- Do not click the right cheek.
- Click the nose twice.
- Click the tongue once.
When all row and column totals align with the required numbers, the safe will automatically open.
Reward: Underwater Photo
Phone (Dirk & Wirman’s Bunk)
Location: Examine the phone beside the tuxedo inside Dirk & Wirman’s Bunk.
Rather than numbers, this puzzle focuses on symbols arranged in rows and columns. Every symbol belongs simultaneously to a row and a column, making the correct placement crucial for fitting both categories.
This puzzle’s complexity comes from arranging the symbols rather than a fixed step sequence; moving a single piece affects multiple patterns.
Solution: