


- All Cosmetics in WEBFISHING
- Labelled Map
- Ghost Rod Location
- Buddy Upgrades Guide
- How to Find Forbidden Forest in WEBFISHING
- Spectral Bone Locations for Spectral Rod
- Character Titles
- List of All Fish in WEBFISHING
- How to Fish in WEBFISHING
- Understanding the underlying mechanics of fishing can help you anticipate what kind of fish will bite and when to maximize your haul.
- Loot Tables Fishing spots determine your loot table: freshwater tables apply to lakes and rivers, saltwater tables to the ocean. Rain conditions introduce a special rain table for rarer fish, while a junk table holds non-fish items like diamonds and trash. Fishing is governed by randomness but also by water type and weather.
- In essence, your location mainly controls whether you catch freshwater or saltwater fish, with special conditions allowing for rarer hauls or junk.
- Rolling
- Lures
Fishing is more than a pastime in WEBFISHING; it’s a fundamental gameplay loop driving exploration and collection. Getting a handle on the fishing mechanics, baits, and location effects can drastically improve your catches, whether you’re after common fish or elusive rarities.
All Cosmetics in WEBFISHING
Labelled Map

Ghost Rod Location
Buddy Upgrades Guide
How to Find Forbidden Forest in WEBFISHING
Spectral Bone Locations for Spectral Rod
Character Titles

List of All Fish in WEBFISHING
How to Fish in WEBFISHING
Preparation
Equipping a fishing rod is your first step toward successful fishing. Bait is equally important and can be sourced by picking up worms from the ground or purchasing from the fox vendor who also buys your items.
This mode can be played from early to late game, so you don’t need to prepare much. But if you need a build, here’s a suggestion:
- Fishing Rod: You definitely need a fishing rod to catch fish.
- Bait: Another important thing is bait. You can find some worms on the ground, or you can find a fox with a big sign to get bait. The fox also lets you buy bait and sell items.
Go to a Body of Water
You’ll need to find a lake, river, or ocean spot to cast. Each water type influences the fish you can catch. For example, the waterfall near the main area is preferred by many players because the flowing water automatically cleans your fish, simplifying inventory management.
You can go to a lake or the ocean, whichever fish you prefer to catch. The important thing is to be near a body of water.
- My Favorite Spot: My favorite fishing spot is the waterfall near the main area. Why? Because the flowing river water cleans my fish, which is really convenient for me.
Cast Carefully
Press the primary mouse button (M1) to cast your line. Ensure your bobber lands on the water; otherwise, you won’t hook any fish. Watch for a small exclamation mark that signals a fish bite, indicating it’s time to reel in.
When you press the M1 button, a little aiming thing appears on the screen. You need to make sure it lands on the water, otherwise your bobber will just hit the ground and you won’t catch anything.
- When Does the Fish Bite?: If you see a small exclamation mark above your head, that means a fish is on the bobber. Be ready!
Reeling In
Once hooked, hold M1 to fill the meter displayed to the left of the screen before the red void reaches you. Successfully filling the meter will land the fish.
If you’ve caught a fish, hold the M1 button and try to fill up the meter on the left side of the screen. You need to fill it up before the red void catches up!
This section was created by dragongirlsnout. You can view the original guide from the link.
Understanding the underlying mechanics of fishing can help you anticipate what kind of fish will bite and when to maximize your haul.
Fishing in WEBFISHING is a bit simpler than in real life, but a good understanding is still key to maximising your fishing prowess. If you just want to know what lures are good, you can skip to the next section. But to start, let’s introduce a few key concepts.
Loot Tables Fishing spots determine your loot table: freshwater tables apply to lakes and rivers, saltwater tables to the ocean. Rain conditions introduce a special rain table for rarer fish, while a junk table holds non-fish items like diamonds and trash. Fishing is governed by randomness but also by water type and weather.
Think of loot tables as a bucket of fish that you pick from every time you cast your rod. What bucket you get to fish in depends on where and when you’re fishing.
The two most obvious and largest loot tables are the freshwater and saltwater tables. These contain all of the basic fish you can expect to hook regularly. Supplementing these two tables, as of the time this guide was penned, are two more tables: the rain table, and the junk table. The rain table contains only the anomalocaris, helicoprion, horseshoe crab, and leedsichthys, and the junk table contains all the non-fish items that you can reel in (including diamonds).
There are more tables, but these are either unused, or are the table that contains only the UFO. This guide will not cover how to catch the UFO, there are other lovely guides out there that will instruct you upon how to do so.
As mentioned, the loot table your hook ends up in depends on where and when you’re fishing, as well as a third important factor: RNG.
Whether you fish from the fresh or saltwater tables is entirely determined by the player: Lakes, rivers, and the well all count as freshwater, the sea is saltwater, and the Fresh and Salty lures work exactly as the game states. The outliers are the rain and junk tables.
There’s a 5% chance to fish up junk items (rising to 10% with the Magnet Lure) and an 8% chance to catch rain table fish if it’s currently raining. These probabilities override each other based on their order.
If it is currently raining, there is an 8% chance that you will be lucky enough to earn a catch from the rain table. Note that this 8% chance will *override* the junk table if it is chosen first.
So, to summarise: Fishing in freshwater will usually net you a freshwater fresh, fishing in saltwater will usually net you a saltwater fish, there’s a 5% (10% with Magnet Lure) chance of fishing up junk at any given time, and an 8% chance of fishing up a special rain table fish if it’s currently raining.
In essence, your location mainly controls whether you catch freshwater or saltwater fish, with special conditions allowing for rarer hauls or junk.
Baits
Baits vary in efficacy, influencing which tiers and rarities of fish you attract. Using higher tier baits broadens your chances of catching rarer and higher-tier fish, critical for filling your journal and earning greater rewards.
You can use weaker baits if you’re trying to catch lower rarity fish, but using the strongest bait is also a good idea since you’ll need those higher rarity fish for your journal.
Worms – Free bait that catches only Tier 1 and Tier 2 fish of Normal rarity.
- Catches: Only Tier 1 and Tier 2 fish.
- Rarity: Can only bait 0 Star (Normal) rarity fish.
- Best for: Tier 1 & Tier 2 0 Star (Normal) fish.
Crickets – Affordable bait that covers all tiers but only up to Shining rarity fish.
- Catches: All Tiers of fish (Tier 1, Tier 2, & Tier 3).
- Rarity: Can only bait 0 & 1 Star (Normal & Shining) rarity fish.
- Best for: Tier 3 0 Star (Normal) fish.
Leeches – Mid-range bait capable of attracting Normal, Shining, and Glistening rarity fish across all tiers.
- Catches: All Tiers of fish (Tier 1, Tier 2, & Tier 3).
- Rarity: Can bait 0, 1 & 2 Star (Normal, Shining, & Glistening) rarity fish.
Minnows – Slightly pricier bait that reaches up to Opulent rarity fish and works on all tiers.
- Catches: All Tiers of fish (Tier 1, Tier 2, & Tier 3).
- Rarity: Can bait 0, 1, 2 & 3 Star (Normal, Shining, Glistening, & Opulent) rarity fish.
- Best for: 1 Star (Shining) rarity fish.
Squid – Higher-value bait that can catch all except Alpha rarity fish.
- Catches: All Tiers of fish (Tier 1, Tier 2, & Tier 3).
- Rarity: Can bait all fish except for 5 Star (Alpha) rarity fish.
- Best for: 2 Star (Glistening) rarity fish.
Nautiluses – The most expensive bait, capable of attracting all rarity levels including Alpha fish.
- Catches: All Tiers of fish (Tier 1, Tier 2, & Tier 3).
- Rarity: Can bait all rarity fish.
- Best for: 3 Star (Opulent), 4 Star (Radiant), & 5 Star (Alpha) rarity fish.
Rolling
Rolling
After your loot table selection, the game picks four fish candidates via weighted RNG. Normally, the last fish is chosen but specific lures allow you to override this choice to select, for example, the smallest or largest among them.
By default, the last of these four fish is “chosen” and this is the fish you’ll end up catching. However, depending on what lure you have equipped, the game will look through all four candidates, and choose whichever best suits our lure. For example, with the Fly Hook equipped, the smallest of these four fish will always be chosen, and with the Large Lure, the largest of the four will always be chosen. The two other lures that can intervene at this point in the procedure are the Sparkling Lure, and our enigmatic friend, the Golden Hook. But now that we’ve covered the mechanics of fishing, we can move onto a broad summary of each lure’s abilities.
Lures
Lures
Lures provide various effects such as increasing bait use, starting mini-games, or improving the chance of catching rare fish or valuable junk. Choosing the right lure can significantly affect your profit and catch quality.
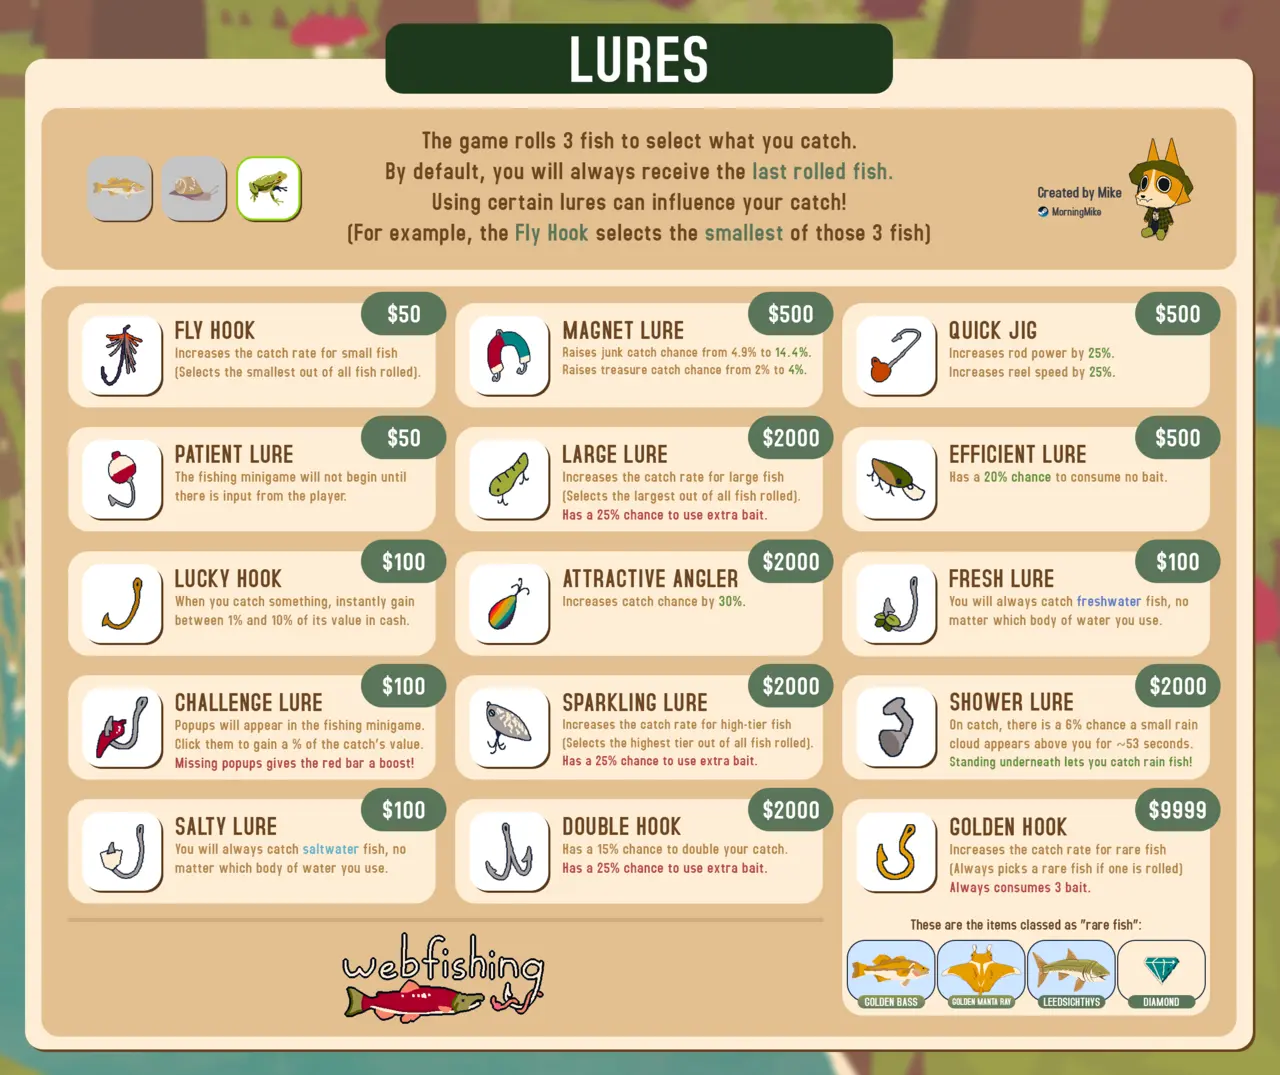
Okay Lures offer baseline benefits usable for all fish, but specialized lures outperform them in targeted scenarios.
Top OK Lures include:
- Golden Hook for rarest catches.
- Double Hook to maximize monetary gains.
- Attractive Angler if your goal is variety without profit concerns.
- Golden Hook – Best for Extremely Rare fish.
- Double Hook – Best if you want to earn cash.
- Attractive Angler – Great if you don’t need cash and already have all Extremely Rare fish.
Why Double Hook Stands Out for Cash
The average fish value is about $200. Using Double Hook, 15% of the fish you catch are doubled in quantity, and 25% of bait usage also doubles catch count, resulting in roughly $2,575 after costs. This is a substantial gain compared to other lures.
- Average Fish Value: $200
- With a Double Hook, about 15 out of 100 fish will be doubled, and 25 will use double bait. This means you’ll earn around $2,575 after costs.
- A Lucky Hook only increases your cash by about $1,000 on average, making it less effective.
- The Challenge Lure isn’t very strong by mid-game and takes more time to earn less cash, which can hurt your overall profits.