


- Understanding the explosive requirements for different structures is key to planning your assault. Extensive testing reveals how many charges each structure can take before falling, allowing you to prepare accordingly and avoid overloading your inventory unnecessarily.
- C4 Is the Best Choice for Base Breaching
- Building Damage Per Explosive
- How Explosives Work Against Vehicles
- Where to Hit Vehicles
- L2A6 Tank Armor
- RPG-7 vs MAAWS for Vehicles
- C4 and IED Vehicle Damage Can Vary
- What Explosives Should You Carry?
Breaking through a fortified base in Wardogs demands precision and efficiency. Knowing exactly how many explosives to bring can be the difference between a successful raid and a wasted loadout. Choosing the right type of explosive based on your target—whether walls, doors, or vehicles—is crucial to maximizing your impact and preserving resources.
This Wardogs Explosives Cheat Sheet gives you the numbers you need for doors, walls, FOBs, Drill Rigs, and other defensive structures. The Frag Grenade and MGL-40 numbers are rough estimates, so I wouldn’t rely on them when trying to break into a base.
Understanding the explosive requirements for different structures is key to planning your assault. Extensive testing reveals how many charges each structure can take before falling, allowing you to prepare accordingly and avoid overloading your inventory unnecessarily.
Here is how many hits or explosives each structure takes to demolish. This data is based on the available testing:
| Building | C4 | IED | RPG-7 | MAAWS | MGL-40 | M67 Frag |
|---|---|---|---|---|---|---|
| Door | 1 | 1 | 1 | 1 | 3 | 3 |
| Gate | 1 | 1 | 2 | 4 | 25 | ~25 |
| HESCO Wall (Large) | 4 | 2 | 7 | 8 | 15 | ~10 |
| HESCO Wall (Small) | 2 | 1 | 4 | 4 | 12 | 6–7 |
| Bremer Wall | 7 | 5 | 12 | 12 | 50 | ~50 |
| Sandbags | 1 | 1 | 1 | 1 | 7 | ~7 |
| Barbed Wire | 1 | 1 | 1 | 1 | 3 | 2 |
| Hedgehog | 6 | 3 | 8 | 9 | 100 | ~100 |
| L81 Mortar | 3 | 2 | 4 | 4 | 34 | 34 |
| Stingray | 3 | 2 | 4 | 4 | 34 | 34 |
| Vanguard CIWS | 3 | 1 | 7 | 7 | 50 | 50 |
| Talon 9K-SAM | 1 | 4 | 4 | 4 | 34 | 34 |
| Forward Operating Base | 5 | 1 | 6 | 6 | 50 | 50 |
| Drill Rig | 2 | 1 | — | — | — | — |
While frag grenades and the MGL-40 can inflict damage, their effectiveness varies greatly due to placement and damage output, making them unreliable choices for cracking through fortified defenses. Stick with heavier explosives for guaranteed results.
C4 Is the Best Choice for Base Breaching
C4 stands out as the optimal choice for breaching thanks to its portability and effectiveness against most base defenses. It strikes a balance between destructive power and ease of use, enabling tactical flexibility during raids.
A basic breach can be very cheap:
- Door: 1 C4
- Gate: 1 C4
- Small HESCO Wall: 2 C4
- Large HESCO Wall: 4 C4
- Bremer Wall: 7 C4
- FOB: 5 C4
- Drill Rig: 2 C4
Including IEDs alongside C4 offers extra firepower, especially against tougher targets like Forward Operating Bases and Drill Rigs, giving you versatility depending on your raid goals.
Don’t overlook the value of Halligan Bars. When multiple doors obstruct your path, they can save you valuable explosives by facilitating quicker manual breaches.
Building Damage Per Explosive
To fine-tune your explosive management, it helps to understand the relative damage inflicted by each weapon type against specific structures. This allows mixing explosives strategically when your loadout limits you.
| Building | C4 | IED | RPG-7 | MAAWS | MGL-40 | M67 Frag |
|---|---|---|---|---|---|---|
| Door | 100 | 100 | 100 | 100 | 40 | 40 |
| Gate | 100 | 100 | 68 | 25 | 4 | 4 |
| HESCO Wall (Large) | 28 | 53 | 15 | 14 | 7 | 12 |
| HESCO Wall (Small) | 50 | 100 | 26 | 26 | 9 | 17 |
| Bremer Wall | 15 | 21 | 9 | 9 | 2 | 2–3 |
| Sandbags | 100 | 100 | 100 | 100 | 14 | 14 |
| Barbed Wire | 100 | 100 | 100 | 100 | 40 | 80 |
| Hedgehog | 17 | 37 | 13 | 12 | 1 | 1 |
| L81 Mortar | 33 | 50 | 28 | 25 | 3 | 3 |
| Stingray | 33 | 50 | 28 | 25 | 3 | 3 |
| Vanguard CIWS | 40 | 100 | 16 | 15 | 2 | 2 |
| Talon 9K-SAM | 100 | 25 | 28 | 25 | 3 | 3 |
| Forward Operating Base | 22 | 100 | 18 | 17 | 2 | 2 |
| Drill Rig | 60 | 100 | — | — | — | — |
How Explosives Work Against Vehicles
Vehicles introduce a new challenge because disabling them often involves targeting specific components rather than just depleting a total health bar. Knowing where to strike to immobilize or destroy can turn the tide of any vehicle encounter.
The vehicle’s health bar appears near the bottom of the screen, but that bar does not show which part of the vehicle has been damaged. You can see the actual damage in the engine.
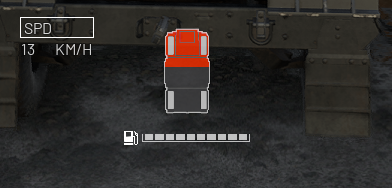
Tires and tracks have individual health bars. Taking these out slows vehicles or stops them completely, making them prime targets for quick neutralization.
Where to Hit Vehicles
For most vehicles, explosives deal more damage when concentrated around the front engine area. This is where you should aim your charges or shots to maximize the chance of immobilization.
Exceptions like the L2A6 Tank and SPH-2 Artillery Tank have different engine layouts, requiring adjustments in aim to hit vulnerable spots effectively.
A well-placed single explosive behind a tank is often enough to immobilize it. Effective explosives for this tactic include:
- C4
- IED
- RPG-7
- MAAWS
- C4
- IED
- RPG-7
- MAAWS
Anti-tank mines are particularly devastating as they detonate upon contact. They can destroy most vehicles in a single hit, with the notable exception of the L2A6 Tank, which can survive an initial blast but starts burning if hit from behind.
An L2A6 can survive the mine and keep moving. However, if it backs over an AT mine, it will start burning and may be destroyed if nobody repairs it.
L2A6 Tank Armor
The L2A6 Tank is distinguished by an additional armor layer at the front, represented by a yellow bar above its main health. This extra protection requires specific tactics to penetrate effectively.
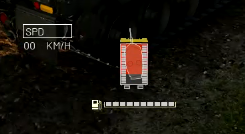
While RPG-7 rockets are less effective against this heavy armor, the MAAWS excels, capable of destroying it with just two shots. This elevated efficiency makes MAAWS a crucial tool against these fortified vehicles.
This means the MAAWS’s utility extends beyond building damage, serving as the preferred choice when engaging heavily armored targets like the L2A6.
RPG-7 vs MAAWS for Vehicles
- MAAWS: 1 shot for destroying a Humvee side or front, 1 shot for tanks.
- RPG-7: Requires 3 shots to destroy a Humvee and 4 shots for tanks, targeting their weak spots.
- Drill Rig: Can be demolished with 3 RPG-7 shots.
C4 and IED Vehicle Damage Can Vary
Placement of C4 and IEDs on vehicles can be inconsistent, sometimes requiring multiple charges to disable the same model, making these less reliable for moving vehicles compared to rocket launchers like the RPG-7.
The RPG-7’s range advantage allows you to engage vehicles from a safer distance without risking exposure, which is invaluable on dynamic battlefields.
AT mines work well for prepared defenses due to their automatic detonation, whereas IEDs require manual triggering and provide an audible warning, potentially alerting enemies.
What Explosives Should You Carry?
For typical base assaults, C4 remains the cornerstone of your explosive arsenal. Its efficiency and compactness give a significant edge in mobility and firepower.
The ideal explosive loadout balances flexibility and effectiveness:
- C4: Primary tool against base structures such as doors, gates, and walls.
- IED: Supplementary charges to concentrate explosive power on fortified objectives like FOBs and Drill Rigs.
- RPG-7: Versatile and essential for attacking vehicles and engaging at distance.
- MAAWS: Specialized for taking down heavily armored vehicles like the L2A6 Tank efficiently.
- AT Mines: Defensive measure to deter or slow enemy vehicles.
- Halligan Bar: Useful in conserving explosives by manually breaching multiple doors when necessary.